
If your Oculus headset is displaying a black screen with three dots, it means that the device is stuck or unable to load properly. To fix this issue, you can try performing a full reboot or a factory reset of the headset.
Turn off the headset and hold the power and volume (-) buttons simultaneously until the boot screen appears. Then, use the volume buttons to highlight “Factory Reset” and press the power button to confirm. Another potential solution is to ensure that your headset is getting enough power by connecting it to a reliable power source.

Credit: m.majorgeeks.com
Understanding The Oculus Black Screen With Three Dots
You put on your Oculus headset, ready to dive into the virtual world. However, instead of being greeted with a vibrant display, all you see is a dark grayish black screen with three dots flashing before your eyes. Frustration sets in as you press the buttons on your controller, but nothing seems to work.
The black screen issue on Oculus can be caused by various factors. Some common causes include:
- Software glitches or bugs
- Incomplete or failed software updates
- Hardware compatibility issues
- Insufficient power supply
The three dots that appear on the black screen have a specific significance. They indicate that the Oculus headset is still trying to load or process something. It could be attempting to launch an app, load a game, or establish a connection. The presence of these dots suggests that the system is not frozen but rather engaged in a loading process.
To resolve the black screen issue on your Oculus headset, you can try the following potential fixes:
- Perform a Full Reboot: Turn off your headset and unplug the power cable. Wait for a few seconds, then reconnect the power cable and turn on the headset.
- Factory Reset: If a reboot doesn’t solve the issue, you can try a factory reset. To do this, hold down the power and volume (-) button on your headset simultaneously until the boot screen appears. Use the volume buttons to select “Factory Reset” and press the power button to confirm.
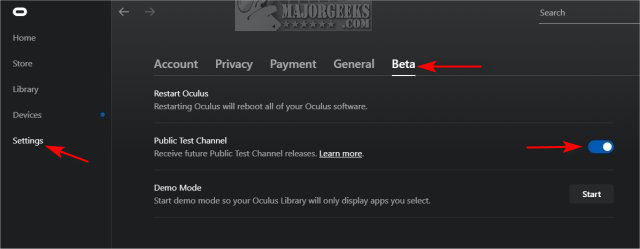
- Check for Software Updates: Make sure your Oculus software is up to date. Go to the settings menu, select “About” and check for any available updates. If updates are found, install them and restart your headset.
- Charge the Headset: Low battery levels can cause the black screen issue. Connect your headset to a power source and let it charge for a while before attempting to use it again.
- Check Hardware Connections: Ensure all cables and connections are secure and properly connected to your Oculus headset. If any cables appear damaged, consider replacing them.
By following these potential fixes, you can improve the chances of resolving the black screen issue with three dots on your Oculus headset. Remember, if the problem persists, it may be necessary to seek help from Oculus customer support or consult the user community for further assistance.
Causes Of The Black Screen
Experiencing the Oculus black screen with three dots can be frustrating. Luckily, there are easy fixes available. From a full reboot to a factory reset, these methods can help resolve the issue and get you back to enjoying your VR experience.
Hardware Issues
One of the common causes of the Oculus black screen with three dots is hardware issues. These issues can range from faulty cables to problems with the headset itself. Here are some potential hardware issues that could be causing the black screen:
- Defective HDMI cable or port: Check if the HDMI cable is securely connected to both the computer and the headset. Also, try using a different HDMI port to see if the issue persists.
- USB connection problems: Ensure that the USB cable connecting the headset to the computer is tightly plugged in. If using an extension cable, try removing it and connecting the headset directly.
- Headset power issues: Make sure the headset is adequately charged or connected to a power source. A low battery can cause performance problems, including the black screen issue.
- Damaged or malfunctioning headset components: Inspect the physical components of the headset, such as the lenses or display, for any signs of damage. If you find any issues, consider contacting Oculus support for further assistance.
Software Glitches
Software glitches can also contribute to the black screen with three dots. These glitches can occur due to outdated software, incompatible drivers, or conflicts between system processes. Here are some software-related causes of the black screen issue:
- Outdated Oculus software: Ensure that both the Oculus app on your computer and the firmware on the headset are up-to-date. Installing the latest software updates may help resolve compatibility issues.
- Incompatible graphics drivers: Check if your graphics card drivers are compatible with Oculus. If not, download and install the latest drivers from the manufacturer’s website.
- Conflicting background processes: Some applications or system processes running in the background can interfere with the Oculus software. Close unnecessary programs and disable antivirus software temporarily to see if it resolves the black screen problem.
- Corrupted Oculus files: Occasionally, certain files related to Oculus may get corrupted. To fix this, you can try uninstalling and reinstalling the Oculus software on your computer.
Incorrect Connections
Incorrect connections between the headset and the computer can also lead to the black screen with three dots issue. Here are some things to consider regarding the connections:
- Ensure the video output is set correctly: Double-check that the correct display is selected as the primary output device in the graphics settings on your computer. Additionally, if you have multiple monitors connected, try disconnecting the extra displays temporarily.
- Check the USB port and cable: Make sure you are using a USB 3.0 port for the Oculus headset. If using an extension cable, ensure that it is of good quality and has a suitable length. Faulty USB connections can impact the performance of the headset.
- Verify cable integrity: Inspect the HDMI and USB cables for any signs of damage. Replace them if necessary to ensure a stable connection between the headset and the computer.
By understanding these potential causes of the black screen issue, you can troubleshoot and fix the problem more effectively. Hardware issues, software glitches, and incorrect connections can all contribute to the black screen with three dots on the Oculus headset. Addressing these factors one by one can help resolve the issue and get you back to enjoying your virtual reality experiences.
Significance Of The Three Dots
When you put on your Oculus headset and are greeted by three dots flashing in front of your eyes, it may leave you feeling frustrated and confused. However, these three dots actually have a significant meaning and can provide valuable information about the status of your Oculus device. In this section, we will explore the indications of the system loading, possible connectivity errors, and the video capture indicator represented by these three dots.
Indications Of System Loading
The presence of the three dots on your Oculus headset screen often indicates that the system is loading. This loading process occurs when you turn on or restart your device or when you launch an application. It is a normal part of the startup process and generally resolves itself after a few moments. However, if the three dots persist for an extended period, it may indicate a potential issue with the device’s software or hardware.
Possible Connectivity Errors
In some cases, the three dots may appear on the screen due to connectivity errors between your Oculus headset and the accompanying device, such as a computer or smartphone. These errors can occur if the connection is unstable or if there are compatibility issues. To resolve this, ensure that all cables are securely connected and that the devices are using the correct software versions. Additionally, restarting both the Oculus headset and the accompanying device can often help resolve connectivity errors and eliminate the presence of the three dots.
Video Capture Indicator
Another significance of the three dots on the Oculus screen is the video capture indicator. This feature is represented by a red dot that appears in the middle of your screen during VR experiences, indicating that a video is being recorded or casted. The video capture indicator can be controlled from the Oculus settings, allowing you to turn it on or off according to your preference. If you see the three dots accompanied by the video capture indicator during regular use, it is likely due to the video recording feature being activated.
To summarize, the three dots on your Oculus headset screen hold various significances. They can indicate the system loading process, potential connectivity errors, and the use of the video capture feature. Understanding these indications will help you troubleshoot issues and ensure a smooth VR experience.
Credit: m.youtube.com
Potential Fixes For The Black Screen With Three Dots
Experiencing the Oculus black screen with three dots issue? Learn about its meaning and potential fixes in this informative article. Discover how to resolve this problem, including options like a full reboot, factory reset, and repair and re-sign in processes.
If you’re experiencing a black screen with three dots on your Oculus headset, don’t panic. This issue is quite common and can be resolved with a few simple fixes. In this section, we will explore three potential solutions to help you get your Oculus headset back up and running.Perform A Full Reboot
One of the initial steps you can take to fix the black screen with three dots issue is by performing a full reboot of your Oculus headset. To do this, follow these steps:- Turn off your headset.
- Hold the power and volume (-) buttons on your headset simultaneously until the boot screen appears.
- Using the volume buttons on your headset, highlight “Factory Reset”.
- Press the power button to confirm.
- Use the volume buttons again to highlight “Yes”.
- Press the power button to perform the factory reset.
Factory Reset The Oculus Headset
If a full reboot doesn’t resolve the black screen issue, you can try a factory reset. However, keep in mind that this will erase all data and settings on your Oculus headset. To perform a factory reset, follow these steps:- Turn off your Oculus headset.
- Hold the power and volume (-) buttons on your headset until the boot screen appears.
- Using the volume buttons, highlight “Factory Reset”.
- Press the power button to confirm.
- Use the volume buttons to highlight “Yes”.
- Press the power button to perform the factory reset.
Repair And Resign In
If the previous fixes didn’t work, you can attempt repairing your Oculus headset and signing in again. Follow these steps to do so:- Turn off your Oculus headset.
- Open the Oculus app on your smartphone.
- Tap on the “Settings” tab.
- Select your headset.
- Tap on “Forget Device”.
- Put on your Oculus headset and go through the setup process again, signing in with your Oculus account.
Credit: m.majorgeeks.com
Frequently Asked Questions On Oculus Black Screen 3 Dots – What Does This Mean + How To Fix
How Do I Fix The 3 Dots On My Oculus?
To fix the 3 dots on your Oculus: 1. Hold the power and volume (-) button down until the boot screen appears. 2. Use the volume buttons to highlight “Factory Reset” and press the power button. 3. Use the volume buttons to highlight “Yes” and press the power button.
This will reset your Oculus and hopefully fix the issue.
How Do I Fix My Black Screen On Oculus?
To fix a black screen on Oculus, follow these steps: 1. Turn off your headset. 2. Hold the power and volume (-) button simultaneously until the boot screen loads. 3. Use the volume buttons to select Factory Reset and press the power button.
4. Select Yes to confirm.
How Do I Reset My Oculus Dots?
To reset your Oculus dots, follow these steps: 1. Turn off your headset. 2. Press and hold the power and volume (-) buttons simultaneously until the boot screen appears. 3. Use the volume buttons to select Factory Reset and press the power button.
4. Highlight Yes using the volume buttons and press the power button. That’s it! Your Oculus dots will be reset.
Why Is There A Dot On My Oculus Screen?
The dot on your Oculus screen is a video capture indicator. It appears in the middle of your screen to show that you’re recording or casting. You can control this feature in Settings. To turn it on or off, press / on your right Touch controller to bring up the universal menu.
Conclusion
If you’re experiencing the frustrating issue of a black screen with three dots on your Oculus VR headset, don’t panic. There are a few simple steps you can take to fix this problem. First, try doing a full reboot or factory reset of your device.
If that doesn’t work, you can also try repairing and resigning in. Remember to check if your headset is receiving enough power and if the video capture indicator is on or off. By following these troubleshooting steps, you’ll be able to resolve the black screen issue and enjoy your Oculus VR experience once again.

I write about my tech experiences to help those going through the same.